


If you are considering building your e-commerce platform, you may explore Next.js, an emerging technology recently gaining popularity among developers. Next.js is a robust and scalable React-based framework that empowers developers to construct web applications rapidly. Additionally, having facts clear about integrating a Next.js headless CMS for efficient content management and exploring various options for Next.js hosting is crucial for success.
In this blog post, you will learn why Next.js and how to build the next js e-commerce website, taking advantage of its features to deliver a seamless and dynamic user experience. We will guide you through creating a high-performance and user-friendly Next.js website for your e-commerce venture.
What is Next.js?
Next.js is a React-based framework that simplifies building scalable and performant web applications. Its key features include server-side rendering (SSR), automatic code splitting, and a straightforward API for building dynamic web pages. When it comes to e-commerce, these features are particularly advantageous. Additionally, Next.js middleware provides flexibility and extensibility, making handling tasks such as Nauthentication or custom routing easier. To get started, developers can install Next.js using the appropriate command “next.js install”, and for those preferring TypeScript, Next.js TypeScript for a typed development experience.
Key Advantages:
Server-Side Rendering (SSR): Unlike traditional client-side rendering, Server-Side Rendering (SSR) enables your e-commerce website to generate pages on the server and transmit a fully rendered HTML page to the client.This results in faster initial page loads and better search engine optimization (SEO).
Automatic Code Splitting: Next.js optimizes the loading of your application by splitting your code into smaller chunks. This means that only the code required for the current page is loaded, reducing initial loading times and improving overall performance.
Straightforward API: Next.js latest version simplifies complex tasks with its intuitive API structure, allowing developers to concentrate on feature development rather than grappling with configuration complexities.
Next.js and React Native: Next.js React Native can be utilized together for a seamless development experience across web and mobile platforms.
Next.js File Structure: The Next.js framework provides a well-defined Next.js file structure that improves project organization and maintenance, making it easier for developers to navigate and understand the codebase.
How to Set Up Your Next.js Project?
Building a successful e-commerce website begins with a solid foundation. This section will guide you through setting up your Next.js project. By the end of this section, you'll have a well-organized project structure and the necessary dependencies to kickstart your e-commerce development.
Installation and Project Initialization:
To start with Next.js, we will use the ‘create-next-app command,’ a convenient tool to set up a new project quickly. Open your terminal and run the following command:

Replace "my-e-commerce-store" with your desired project name. This command installs the necessary dependencies and creates a basic project structure for your Next.js application.
Configuring Project Structure:
Understanding the project structure is essential for smooth development. The generated project will consist of various folders and files. Key directories include:
- Pages: Contains the pages of your application. Each file represents a unique page, and the structure determines the URL.
- Public: Holds static assets like images and fonts. Files in this directory are served as-is without any special processing.
- Styles: Houses global styles for your application.
- Components: Ideal for storing reusable React components used across different pages.
- Lib: An excellent place to put utility functions or code you want to share between components.
Integrating Essential Dependencies and Libraries:
Next.js works seamlessly with a variety of libraries that enhance the development process. Here are some essential dependencies to consider integrating:
- Tailwind CSS: A utility-first CSS framework that makes styling a breeze. Install it using:

Credit:https://anasbayu.medium.com/tailwindcss-with-sveltekit-257d06da7800/
Configure Tailwind CSS by following the setup instructions in the official documentation.
- Redux: For state management, install Redux and its related dependencies:

Create the necessary folders and files for Redux in the ‘src’ directory, including actions, reducers, and the store configuration.
- Axios: A promise-based HTTP client for making API requests.

Use Axios for seamless communication with your backend API.
Designing your E-commerce
Once your Next.js project is set up and configured, the next step is designing an appealing and user-friendly e-commerce store.
Choosing a Design System or UI Framework:
Selecting a design system or UI framework is a crucial decision that impacts the visual consistency and user experience of your e-commerce store. Consider the following popular options:
- Material-UI: A React UI framework that follows the Material Design guidelines. It offers a collection of pre-designed elements and styles.

Integrate Material-UI components into your project for a clean and modern design.
- Ant Design: A complete React UI library with many components and a cohesive design language.

Leverage Ant Design components for a polished and feature-rich interface.
- Tailwind CSS: While primarily a utility-first CSS framework, Tailwind CSS can also be used to build custom designs from scratch.

Credit:https://anasbayu.medium.com/tailwindcss-with-sveltekit-257d06da7800/
Configure and customize Tailwind CSS to match your e-commerce brand and design preferences.
Creating Reusable Components:
Break your e-commerce store into reusable React components to maintain a clean and modular codebase. Focus on components such as:
- Header and Footer: Design a consistent and navigable header and footer for your website. Include elements like the logo, navigation menu, and contact information.
- Product Card: Create a reusable component to display product information, including the product image, name, price, and a link to view more details.
- Category Filters: Implement filters to help users narrow down products based on categories, prices, or other relevant criteria.
- Shopping Cart: Design a responsive shopping cart component that summarizes selected items and allows users to proceed to checkout.
- Pagination: If your e-commerce catalog is extensive, implement pagination to improve user experience and site performance.
Implementing Responsive Design:
Responsive design is non-negotiable in the age of diverse devices and screen sizes. Ensure your e-commerce store looks and functions well on various devices, from desktops to smartphones.
- Utilize media queries in your styles to adapt layouts based on screen size.
- Test your design on different devices to identify and resolve any responsiveness issues.
- Leverage the power of Next.js to implement server-side rendering, enhancing performance and responsiveness.
Managing State with Redux
As your e-commerce website grows in complexity, effective state management becomes paramount. In this section, we'll explore the integration of Redux into your Next.js project to handle the global state efficiently.
Understanding the Need for State Management:
In a typical e-commerce application, state management becomes challenging due to the dynamic nature of user interactions. Redux offers a centralized store for your application state, streamlining, managing, and updating data across components.
Integrating Redux for Global State Management:
Let's set up Redux in your Next.js project:
- Install the required packages:

- Create a ‘redux’ folder in your ‘src’ directory containing subfolders for actions, reducers, and the store configuration.
Implementing Reducers, Actions, and Middleware:
Reducers: Define reducers to specify how the state should change in response to actions. For example, you might have a cartReducer to manage the shopping cart state.
Actions: Create action creators to dispatch actions. These actions are objects that describe what should change in the state.
Middleware: If asynchronous operations are involved (e.g., fetching data from an API), use ‘redux-thunk’ as middleware to handle these operations within your actions.
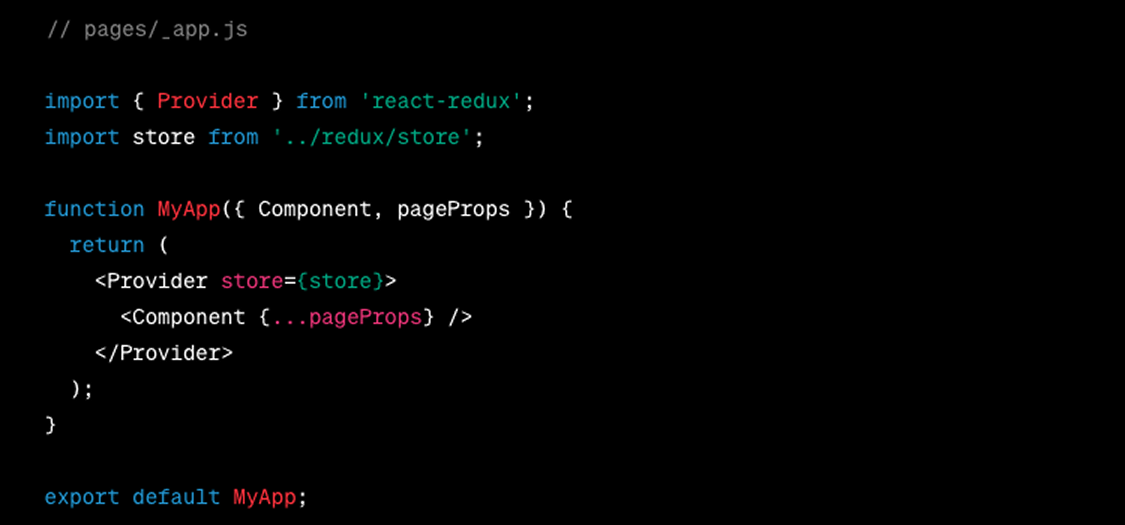
Integrate Redux into your Next.js components.
- Wrap your ‘pages/_app.js’ file with the ‘Provider’ from ‘react-redux’ to make the Redux store available throughout your app.
Fetching and Displaying Product Data
With state management in place, it's time to connect your e-commerce website to a backend API and fetch and display dynamic product data.
Connecting Your E-commerce Website to a Backend API:
- Choose or set up a backend service that provides endpoints for retrieving product information, user data, and other relevant details.
- Utilize Axios or any preferred HTTP client to make API requests.
Fetching and Displaying Product Information Dynamically:
- Implement functions or hooks to fetch product data from your backend API.
- Update your product display components to use this fetched data dynamically.
- Consider paginating large product catalogs to enhance performance.
Handling Loading States and Error Handling:
- Implement loading spinners or skeletons to indicate when data is being fetched.
- Set up error handling mechanisms to handle API request failures gracefully.
Implementing User Authentication
Building trust and securing user data are crucial aspects of any e-commerce platform. Here is the step-by-step process of implementing user authentication in your Next.js e-commerce website.
Securing Your E-commerce Site with User Authentication:
- Choose an authentication provider or strategy for your Next.js application. Standard options include JWT (JSON Web Tokens) or OAuth.
- Install any necessary packages or libraries for your chosen authentication method.
Integrating Authentication Providers:
- Configure your Next.js application to work with the chosen authentication provider.
- Implement login and registration components/pages to allow users to securely create accounts and sign in.
Implementing Private Routes
- Create a higher-order component (HOC) or a custom React hook to protect routes that require authentication.
- Ensure users are directed to the login page when attempting to access protected routes without proper authentication.
Building the Shopping Cart
The shopping cart holds significant importance as a pivotal component within the framework of any e-commerce website. Follow these steps to design and implement a responsive, user-friendly shopping cart in your Next.js application.
Designing a Responsive Shopping Cart:
- Create a dedicated page or component for the shopping cart.
- Design a clean, responsive layout displaying selected items, quantities, and prices.
Managing Cart State and Updating Dynamically:
- Leverage the Redux store to manage the state of the shopping cart globally.
- Implement functions or actions to add, remove, or update items in the cart.
Integrating Features like Quantity Adjustment and Item Removal:
- Enhance the user experience by allowing quantity adjustments within the cart.
- Implement functionality to remove items from the cart.
Checkout and Payment Integration
A smooth and secure checkout process is responsible for converting potential customers into successful transactions.
Research Different Payment Gateways:
- Research and choose a payment gateway that best fits your business needs. Popular options include Stripe, PayPal, and Braintree.
- Sign up for an account with the selected payment gateway and obtain the necessary API keys.
Implementing a Secure and Seamless Checkout Process:
- Design a user-friendly checkout page with fields for shipping information, billing details, and payment options.
- Utilize your chosen payment gateway's API to process payments securely.
Handling Order Confirmation and Integrating with Backend Services:
- Implement order confirmation pages to provide users with a summary of their purchases.
- Integrate your checkout process with backend services to store order information and maintain a record of transactions.
Optimizing Performance
Ensuring that your Next.js e-commerce website performs well is essential for a positive user experience. Follow these strategies to optimize the performance of your online store:’
Leveraging Next.js Features for Server-Side Rendering and Client-Side Optimization:
- Utilize Next.js's server-side rendering (SSR) capabilities to generate pages dynamically on the server, reducing the load on the client.
- Implement client-side optimization strategies, such as code splitting, to selectively load the essential JavaScript required for each page.
Implementing Lazy Loading for Images and Assets:
- Slower load images to improve page load times, especially for users on slower connections.
- Before uploading images to your server, enhance efficiency by optimizing and compressing them to minimize file sizes.
Minimizing HTTP Requests and Optimizing Code Splitting:
- Reduce the volumes of HTTP requests by bundling and compressing your JavaScript and CSS files.
- Optimize code splitting to load only the essential code for the current page, enhancing overall site performance.
Testing and Debugging
A robust testing and debugging process is crucial for identifying and resolving issues in your Next.js e-commerce application.
Writing Unit Tests for Critical Components:
- Utilize testing libraries such as Jest and React Testing Library to write unit tests for critical components.
- Test individual functions, Redux actions, and reducers to ensure their correctness.
Debugging Tools and Techniques for Next.js Applications:
- Leverage browser developer tools for debugging JavaScript and inspecting network requests.
- Utilize Next.js built-in debugging features, including error pages and console logs.
Implementing End-to-End Testing for a Smooth User Experience:
- Implement end-to-end testing using tools like Cypress or Selenium to simulate user interactions and workflows.
- Create test scenarios covering critical paths such as user registration, product selection, and checkout.
Deployment and Hosting
With your Next.js e-commerce website developed and optimized, the next crucial step is deploying it to a hosting environment for public access.
Choose a Hosting Provider for Your E-commerce Site:
- Consider popular hosting providers such as Vercel, Netlify, or AWS Amplify, which seamlessly integrate with Next.js.
- Evaluate factors like ease of deployment, scalability, and performance.
Configuring Deployment Settings for Optimal Performance:
- Connect your Next.js project to your chosen hosting provider.
- Configure deployment settings, including environment variables, build commands, and custom domains.
- Optimize your application build process to ensure efficient production builds.
Ensuring Security Measures for a Production Environment:
- Implement HTTPS to secure data transmission between users and your server.
- Regularly update dependencies and apply security patches.
- Configure server security settings to protect against common vulnerabilities.
Final Words
We have discussed from initially setting up a dynamic website to advanced features like user authentication and payment integration; here are key takeaways:
User-Centric Design: Prioritize a sleek UI with reusable components for a top-notch user experience.
Efficient State Management: Use Redux for scalable and maintainable global state management.
Secure Authentication and Payments: Ensure trust with robust user authentication and secure payment gateways.
Performance Optimization: Leverage Next.js for server-side rendering and optimize with lazy loading and code splitting. Additionally, consider the trade-offs between Next.js vs Node.js and explore the differences between Gatsby vs Next.js for static site generation.
Testing and Debugging: Prioritize testing and use debugging tools for efficient issue resolution.
Deployment and Scaling: Choose reliable hosting, configure deployment, and scale infrastructure as needed. It's also valuable to compare Next.js vs Express for server-side development considerations.

Subscribe to Saffron Tech
Explore your marketing zen with our newsletter! Subscribe now.